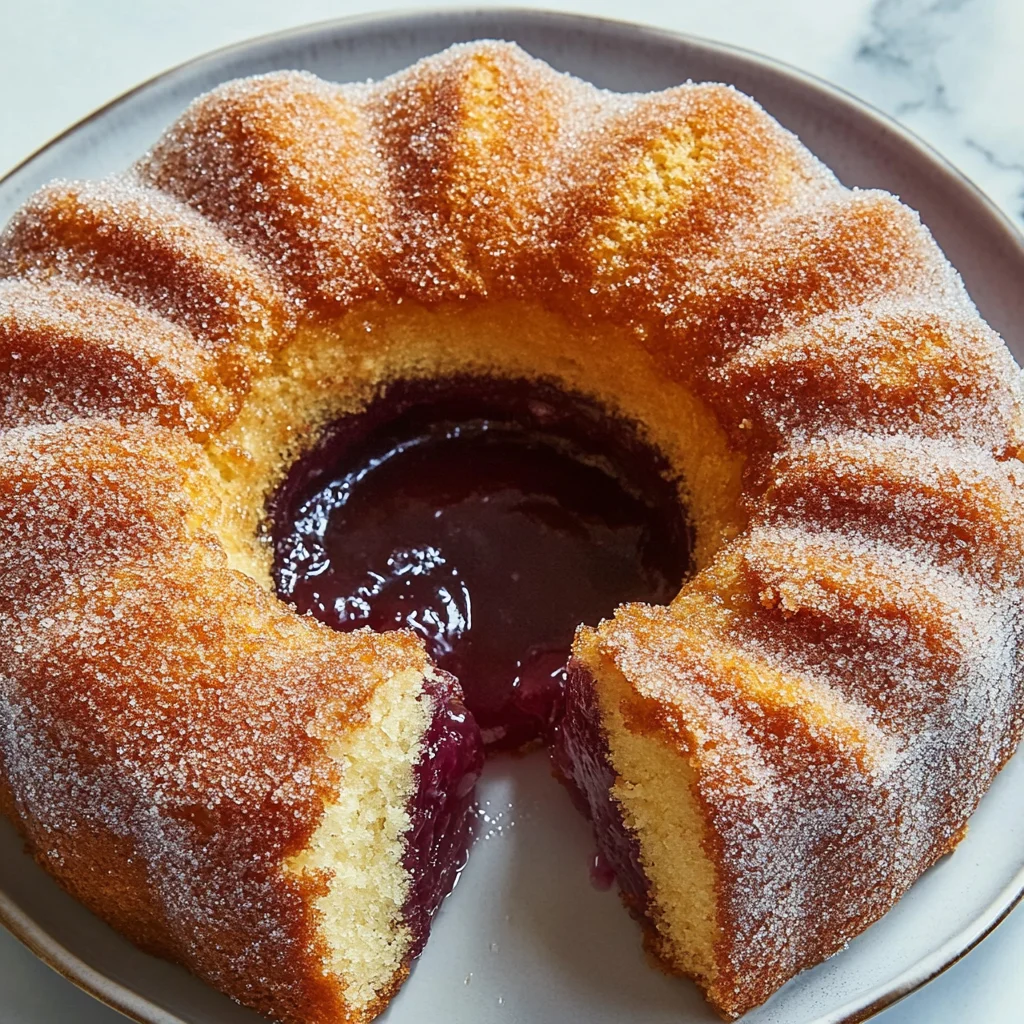
Imagine sinking your fork into a slice of Jelly Doughnut Cake, where the sweet aroma of freshly baked dough mingles with the fruity scent of raspberry filling. Each bite blends rich, moist cake with a luscious, gooey center, making it an irresistible treat that dances on your taste buds and evokes memories of childhood mornings spent eagerly awaiting sugary delights.
This delightful creation is perfect for festive gatherings or cozy family brunches, promising to bring smiles all around. As you savor each mouthful, you’ll be transported back to simpler times, with laughter and joy filling the air—because who wouldn’t want a slice of nostalgia wrapped in sweetness?
Why is Jelly Doughnut Cake a must-try?
Deliciously unique: This Jelly Doughnut Cake combines the beloved flavors of classic jelly doughnuts into a moist, fluffy cake that will wow your taste buds.
Easy to make: With simple ingredients and straightforward steps, you can whip up this delightful dessert in no time.
Crowd-pleaser: Perfect for parties or brunch, this cake will impress your friends and family with its fun twist on a classic treat.
Versatile flavors: Customize with your favorite jelly or jam for a personal touch that suits everyone’s palate!
Time-saving: Skip the frying mess—this baked version offers all the flavor without the fuss!
Jelly Doughnut Cake Ingredients
For the Cake
- All-purpose flour – a versatile base that gives structure to your cake.
- Granulated sugar – this sweetener enhances the flavor and creates a lovely texture.
- Baking powder – ensures your cake rises beautifully, creating that light, airy crumb.
- Salt – a pinch balances the sweetness and enhances all the flavors.
- Unsalted butter – adds richness and moisture; make sure it’s at room temperature for easy mixing.
- Eggs – binds everything together while adding protein; use large eggs for best results.
- Milk – keeps the cake tender and moist; whole milk works best for creaminess.
For the Jelly Filling
- Fruit jelly or preserves – choose your favorite flavor to create that signature jelly doughnut taste!
For the Glaze
- Powdered sugar – creates a smooth, sweet glaze; sift it for a lump-free finish.
- Milk or cream – thins out the glaze to the perfect consistency; adjust to your preference.
- Vanilla extract – adds an aromatic note to elevate the glaze’s flavor profile.
How to Make Jelly Doughnut Cake
1. Preheat your oven to 350°F (175°C). This step is crucial for achieving that perfect rise and golden color in your cake.
2. Grease a 9×13 inch baking pan with butter or non-stick spray. A well-greased pan ensures your cake releases easily and maintains its lovely shape.
3. Mix the dry ingredients: In a large bowl, whisk together flour, baking powder, and salt until well combined. This creates a balanced base for our delicious jelly doughnut cake.
4. Cream the butter and sugar: In another bowl, beat softened butter and sugar together until light and fluffy—about 3-5 minutes. This adds airiness to your cake!
5. Add the eggs: Incorporate each egg one at a time into the butter mixture, mixing well after each addition. You’re building a beautiful batter here!
6. Combine wet and dry ingredients: Gradually add the flour mixture to the creamed mixture, alternating with milk until smooth. The batter should be thick yet pourable, like a dream!
7. Fold in your favorite jelly: Gently swirl in the jelly of your choice (raspberry or strawberry works wonders). The swirls will create delightful pockets of flavor throughout.
8. Pour the batter into your prepared pan and smooth the top with a spatula. It’s ready for the oven now—bake for about 30-35 minutes or until golden brown.
9. Cool in the pan for 10 minutes before transferring to a wire rack. Letting it cool properly helps maintain that fluffy texture we’re aiming for.
10. Prepare the glaze: While the cake cools, mix powdered sugar with milk until you achieve a smooth consistency that drizzles beautifully over the top.
11. Glaze your cooled cake generously! Allow it to drizzle down the sides for that classic doughnut look—so irresistible!
Optional: Sprinkle powdered sugar on top for an extra touch of sweetness.
Exact quantities are listed in the recipe card below.
Tips for the Best Jelly Doughnut Cake
- Use Fresh Jelly: Opt for high-quality, fresh jelly to ensure vibrant flavor. Stale or overly sweet jelly can overpower your cake.
- Room Temperature Ingredients: Always use room temperature eggs and butter. This helps create a smooth batter and ensures even baking.
- Don’t Overmix: Mix gently until just combined. Overmixing can lead to a dense texture, which is not ideal for a fluffy jelly doughnut cake.
- Test for Doneness: Insert a toothpick into the center; it should come out clean but moist. If it’s wet, give it a few more minutes in the oven.
- Cool Before Glazing: Allow the cake to cool completely before adding glaze or additional jelly. This prevents melting and ensures a beautiful finish.
How to Store and Freeze Jelly Doughnut Cake

Room Temperature: Keep your Jelly Doughnut Cake wrapped in plastic wrap or in an airtight container for up to 3 days. This helps maintain its moist texture and flavor.
Fridge: If you want to extend freshness, store it in the fridge for up to a week. Just remember to cover it well to prevent it from drying out.
Freezer: For longer storage, freeze the cake for up to 3 months. Wrap slices tightly in plastic wrap and then place them in a freezer-safe bag for optimal preservation.
Reheating: To enjoy your Jelly Doughnut Cake warm, simply pop individual slices in the microwave for about 15-20 seconds. This will bring back that delightful softness!
Jelly Doughnut Cake Variations Galore
Feel free to explore your creativity while making this delightful treat; your taste buds will thank you!
- Gluten-Free: Use a gluten-free flour blend in place of all-purpose flour for a deliciously tender cake. It’s perfect for gatherings where dietary needs vary. Trust me, no one will miss the gluten!
- Vegan: Substitute eggs with flaxseed meal and use almond milk instead of dairy. This twist still yields a moist, flavorful cake that everyone can enjoy. You’ll be amazed at how delicious vegan baking can be!
- Jam Swaps: Experiment with different fruit jams like raspberry, apricot, or even chocolate hazelnut spread for a unique flavor explosion. Each jam brings its own character, making every bite an adventure.
- Spiced Up: Add a teaspoon of cinnamon or nutmeg to the batter for a warm, cozy flavor that complements the sweetness beautifully. It’s like wrapping yourself in a soft blanket of spice!
- Nutty Crunch: Fold in chopped walnuts or pecans for an added crunch that contrasts with the soft cake texture. The nuts add richness and depth, making each slice even more satisfying.
- Zesty Twist: Incorporate lemon or orange zest into the batter for a refreshing zing that brightens up the overall flavor profile. Citrus notes will elevate your dessert to new heights!
- Chocolate Drizzle: Drizzle melted chocolate over the top instead of icing for a decadent finish. The combination of chocolate and jelly is simply heavenly and will impress any chocoholic.
- Heat It Up: Add a pinch of cayenne pepper or cinnamon to give your cake a surprising kick! Just a hint will elevate the sweetness to new levels, creating a delightful contrast that surprises and delights.
Make Ahead Options
Jelly Doughnut Cake is an ideal candidate for meal prep, allowing you to savor its delightful flavors with minimal fuss when you’re ready to indulge. You can prepare the cake batter up to 24 hours in advance, simply cover it tightly and refrigerate until you’re ready to bake. For even more convenience, consider making the jelly filling ahead of time—this can be stored in an airtight container in the fridge for up to 3 days. When you’re ready to finish your Jelly Doughnut Cake, just pour the chilled batter into your prepared pan and bake as directed. To maintain that moist texture and rich flavor, ensure the cake is wrapped well if stored in the fridge or at room temperature. Enjoy this deliciously sweet treat without the last-minute rush!
Jelly Doughnut Cake Recipe FAQs
What type of jelly should I use for the cake?
For the best flavor, opt for a high-quality fruit jelly or jam. Classic choices like raspberry or strawberry are wonderful, but feel free to experiment with grape or even orange marmalade for a twist!
How should I store my Jelly Doughnut Cake?
Store your cake in an airtight container at room temperature for up to 3 days. If you want to keep it longer, refrigerate it, where it will last about a week. Just remember to bring it back to room temperature before serving for the best taste and texture!
Can I freeze Jelly Doughnut Cake?
Absolutely! You can freeze your Jelly Doughnut Cake for up to 3 months. To do this, wrap it tightly in plastic wrap and then in aluminum foil. When you’re ready to enjoy it, thaw it overnight in the refrigerator and bring it to room temperature before serving.
What if my cake turns out too dense?
If your cake is dense, there are a couple of things you might consider next time. Make sure not to overmix your batter—mix just until combined! Also, check that your baking powder is fresh; expired leavening agents can result in a heavy cake.
Is there a gluten-free option for this recipe?
Yes! You can easily make this Jelly Doughnut Cake gluten-free by substituting all-purpose flour with a gluten-free baking blend. Look for one that contains xanthan gum, which helps mimic the texture of traditional flour.
Can I use fresh fruit instead of jelly?
While jelly gives that classic doughnut flavor, you can certainly try using fresh fruit! Just be aware that fresh fruit may add moisture and require adjustments in baking time. Consider adding a bit of sugar or cornstarch to help balance the texture and sweetness!
Jelly Doughnut Cake
Ingredients
Method
- Preheat your oven to 350°F (175°C).
- Grease a 9x13 inch baking pan with butter or non-stick spray.
- In a large bowl, whisk together flour, baking powder, and salt until well combined.
- In another bowl, beat softened butter and sugar together until light and fluffy—about 3-5 minutes.
- Incorporate each egg one at a time into the butter mixture, mixing well after each addition.
- Gradually add the flour mixture to the creamed mixture, alternating with milk until smooth.
- Gently swirl in the jelly of your choice.
- Pour the batter into your prepared pan and smooth the top with a spatula.
- Bake for about 30-35 minutes or until golden brown.
- Cool in the pan for 10 minutes before transferring to a wire rack.