Imagine sinking your teeth into a warm, gooey slice of homemade lasagna, where each layer bursts with rich marinara sauce and creamy cheese that practically dances on your palate. The aroma wafting through the kitchen is enough to make even the pickiest eater’s mouth water, leaving you eager for that first delicious bite.
Every family gathering saw my grandmother pulling out her secret recipe, creating not just a meal but a cherished memory that wrapped us in love and laughter. Whether it’s a cozy weeknight dinner or a festive holiday feast, this lasagna promises to deliver an explosion of flavors that will have everyone coming back for seconds, if not thirds.
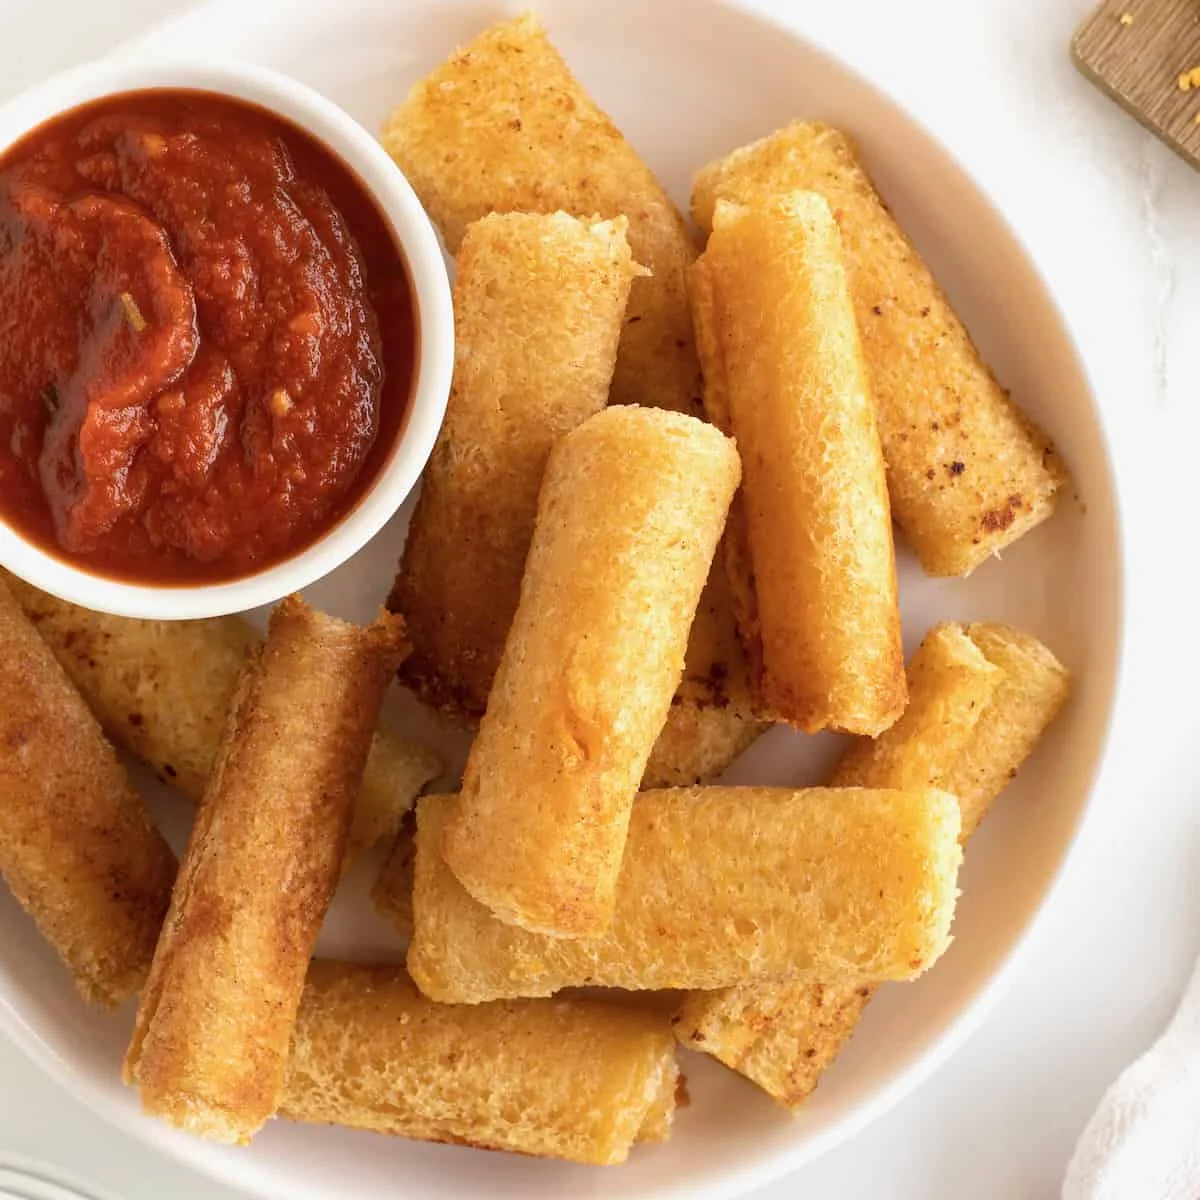
Why are Grilled Cheese Roll-Ups a must-try?
Deliciously unique: These roll-ups transform the classic grilled cheese into a fun, portable snack.
Quick to make: Ready in just 15 minutes, they fit perfectly into your busy schedule.
Ultimate crowd-pleaser: Ideal for kids and adults alike—everyone loves cheesy goodness!
Versatile flavors: Customize with your favorite cheeses or add extras like ham or veggies.
Easy cleanup: Fewer dishes mean more time to enjoy this delightful treat!
Grilled Cheese Roll-Ups Ingredients
For the Roll-Ups
- Bread slices – Choose a soft white or whole wheat bread for easy rolling and a delightful texture.
- Cheese – Use a mix of cheddar and mozzarella for a gooey melt that’s simply irresistible.
- Butter – A generous spread on the outside helps achieve that perfect golden crispiness.
For Dipping Sauce
- Ketchup – A classic choice that pairs beautifully with the savory flavors of grilled cheese roll-ups.
- Mustard – For a zesty twist, consider using yellow mustard or even a spicy Dijon!
How to Make Grilled Cheese Roll-Ups
1. Gather ingredients. Start by assembling your essentials: bread, cheese, butter, and any extras like ham or herbs you’d love to add for flavor.
2. Flatten bread. Use a rolling pin to gently flatten each slice of bread until it’s about 1/4 inch thick; this helps achieve that perfect roll-up texture.
3. Add cheese. Place a slice of cheese (or more, if you’re feeling indulgent!) on each flattened slice of bread, ensuring an even coverage for gooey goodness.
4. Roll tightly. Carefully roll each slice up from one end to the other, making sure the cheese is snugly wrapped inside. Secure with a toothpick if needed!
5. Heat the skillet. Preheat a non-stick skillet over medium heat and melt a tablespoon of butter until it sizzles but doesn’t brown—this is key for crispy perfection.
6. Cook roll-ups. Place the roll-ups seam-side down in the skillet, cooking for about 2-3 minutes on each side until they are golden brown and the cheese is melty.
7. Serve warm. Remove from heat and let cool slightly before slicing into bite-sized pieces—perfect for dipping in marinara or your favorite sauce!
Optional: Serve with a sprinkle of herbs for added flavor and freshness.
Exact quantities are listed in the recipe card below.
Tips for the Best Grilled Cheese Roll-Ups
- Choose the Right Bread: Opt for soft white or whole wheat bread to easily roll without tearing. Avoid crusty loaves that won’t bend.
- Perfect Cheese Blend: Use a mix of cheeses like cheddar and mozzarella for a gooey texture and rich flavor. Experiment with your favorites!
- Don’t Overfill: Keep cheese amounts moderate; too much filling can cause spills while grilling. Aim for just enough to melt deliciously.
- Heat Control: Cook on low to medium heat to ensure the bread gets golden brown without burning, allowing the cheese to melt perfectly.
- Use Butter Wisely: Generously butter the outside of each roll-up for a crisp, flavorful crust. Don’t skip this step for that irresistible crunch!
- Serve Warm: Enjoy your grilled cheese roll-ups immediately after cooking. They taste best fresh and ooze with melty goodness!
Storage Tips for Grilled Cheese Roll-Ups

Room Temperature: Enjoy your grilled cheese roll-ups fresh, but if left out, they should be consumed within 2 hours to maintain quality and safety.
Fridge: Store leftover grilled cheese roll-ups in an airtight container in the fridge for up to 3 days. This keeps them fresh and ready for a quick snack!
Freezer: For longer storage, freeze grilled cheese roll-ups in a single layer on a baking sheet before transferring to a freezer-safe bag. They can last up to 3 months.
Reheating: To reheat, simply pop them in the toaster oven or microwave until heated through. A quick crisp in a skillet can revive that delightful crunch!
Grilled Cheese Roll-Ups: Creative Twists
Elevate your grilled cheese roll-ups by exploring these delightful variations that’ll ignite your culinary imagination.
- Dairy-Free: Substitute regular cheese with vegan cheese or a nut-based spread for a creamy, dairy-free delight. You won’t miss out on the gooey goodness!
- Spicy Kick: Add jalapeño slices or a dash of hot sauce inside for an exciting heat that complements the cheesy flavor beautifully. It’s a little adventure in every bite!
- Herbed Bliss: Mix fresh herbs like basil or oregano into your cheese for an aromatic twist that brightens each roll-up. Your kitchen will smell divine!
- Sweet Surprise: Spread a layer of strawberry jam or apple butter before adding the cheese for a sweet and savory experience. This unexpected pairing is sure to delight!
- Crunchy Texture: Roll your cheese in crushed crackers or breadcrumbs before grilling for an extra crispy exterior. The contrast between soft and crunchy is simply irresistible!
- Veggie-Packed: Incorporate sautéed spinach, mushrooms, or bell peppers for added nutrition and flavor. These colorful additions make each bite more vibrant and satisfying!
- Breakfast Treat: Use scrambled eggs and cheese as the filling for a delightful breakfast version that’s perfect for busy mornings. Who says you can’t have breakfast in a fun way?
Make Ahead Options
Grilled Cheese Roll-Ups are a fantastic recipe for meal prep, allowing you to enjoy this cheesy delight anytime with minimal effort. You can prepare the roll-ups by assembling them up to 24 hours in advance; simply spread your favorite cheese on the bread, roll them up tightly, and store them in an airtight container in the fridge. If you’re looking to save even more time, consider making a batch of these tasty treats and freezing them for up to three months. To finish cooking, just preheat your skillet, add a little butter, and grill the roll-ups for about 3-4 minutes per side until golden brown and melty. Remember, keeping them tightly rolled will help maintain their shape and cheesy goodness!
Grilled Cheese Roll-Ups Recipe FAQs
What type of bread is best for Grilled Cheese Roll-Ups?
For the perfect Grilled Cheese Roll-Ups, I recommend using soft white bread or whole wheat. These types of bread roll easily without cracking, allowing you to create that delightful, gooey center. If you’re feeling adventurous, try sourdough for an extra tang!
How should I store leftover Grilled Cheese Roll-Ups?
Leftover roll-ups can be stored in an airtight container in the refrigerator for up to 3 days. To maintain their crispy texture, reheat them in a skillet over medium heat for about 3-4 minutes on each side until warmed through and crispy again.
Can I freeze Grilled Cheese Roll-Ups?
Absolutely! To freeze, let your roll-ups cool completely, then wrap each one tightly in plastic wrap and place them in a freezer-safe bag. They can last up to 2 months in the freezer. When you’re ready to enjoy them, simply thaw overnight in the fridge and reheat in a skillet or toaster oven.
What if my cheese doesn’t melt properly?
If your cheese isn’t melting as it should, make sure you’re using a good melting cheese like cheddar or mozzarella. Also, cooking on low heat allows it to melt thoroughly before the bread gets too browned—about 2-3 minutes per side should do the trick! If you’re still having trouble, covering the pan with a lid can help trap heat and moisture for better melting.
Are there any dietary alternatives for making these roll-ups?
Certainly! For a gluten-free option, use gluten-free bread that’s soft enough to roll without breaking. You can also substitute dairy cheese with plant-based cheeses or even vegan cream cheese for a delicious dairy-free version. Just keep an eye on melting times; they may vary slightly!
Can I add other ingredients to my Grilled Cheese Roll-Ups?
Yes! Feel free to get creative by adding cooked bacon, sliced tomatoes, or even spinach inside the roll-ups before grilling. Just remember not to overload them; keeping it simple ensures they cook evenly and stay together beautifully!
Grilled Cheese Roll-Ups
Ingredients
Method
- Gather ingredients: bread, cheese, butter, and any extras like ham or herbs.
- Flatten each slice of bread using a rolling pin until about 1/4 inch thick.
- Place a slice of cheese on each flattened slice of bread.
- Roll each slice tightly from one end to the other, securing with a toothpick if needed.
- Preheat a non-stick skillet over medium heat and melt a tablespoon of butter.
- Place the roll-ups seam-side down in the skillet, cooking for 2-3 minutes on each side until golden brown.
- Remove from heat and let cool slightly before slicing into bite-sized pieces.