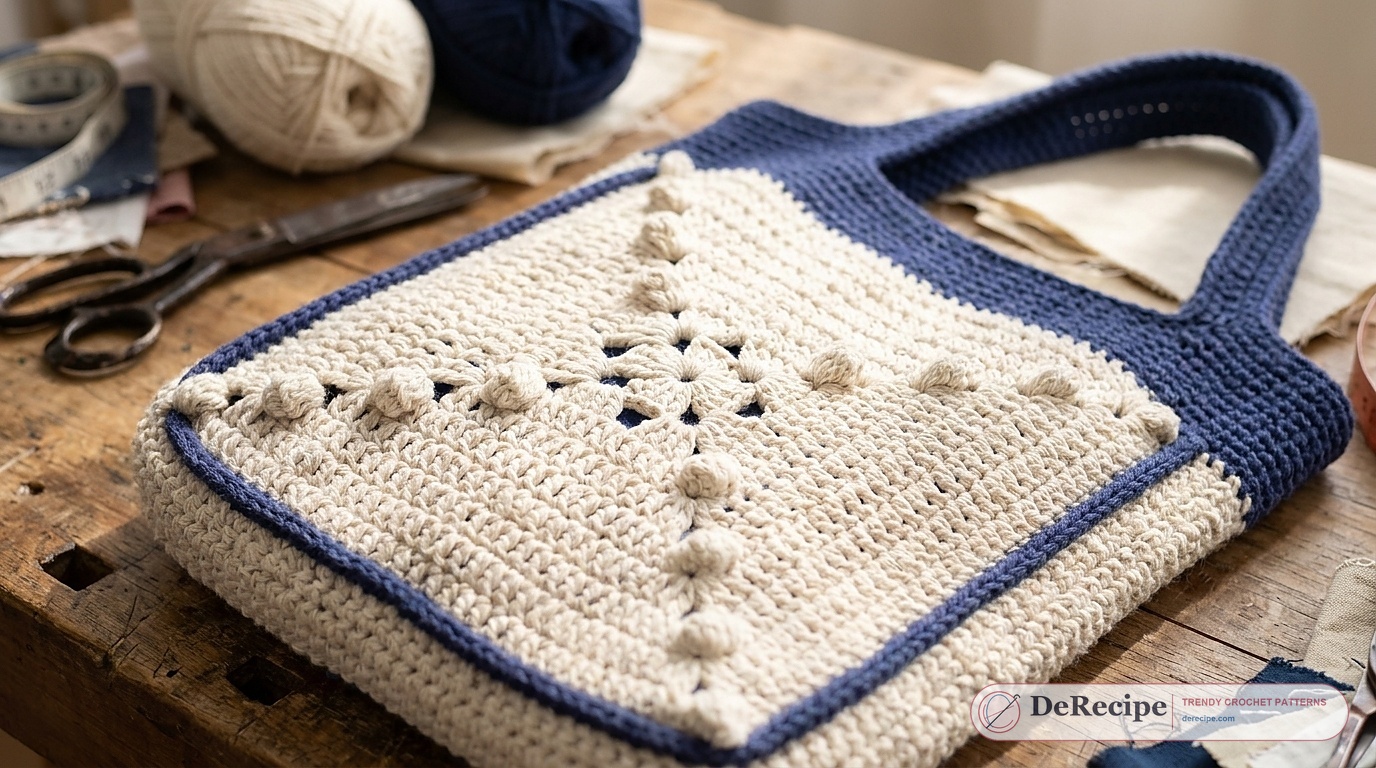
The Bernat Crochet Carry On Tote Bag is a warm project that blends functionality with style. This bag is perfect for carrying your essentials while showcasing your crochet skills. With its unique motif design and contrasting colors, it is sure to turn heads whether you’re heading to the market or the beach.
The pattern shows a series of motifs that are joined as one, creating a sturdy and attractive tote. Its spacious sizes make it suitable for a range of uses, from grocery shopping to a day out. Plus, the use of Bernat Maker yarn ensures a soft yet durable finish.
Bernat Crochet Carry On: Understanding the Motif Construction for This Bag
The tote bag is created from two motifs that are joined as one with a side section. Each motif begins with a ring and is built with rounds of double crochet and popcorn stitches, making it clearly nice and structurally sound. The pattern lists that you should make two motifs with contrast edging. Adds a nice touch to the full design.
Once the motifs are completed, they are connected with a side section that wraps around three sides of the motifs. This design not only creates a unique look but also gives the bag with additional stability and shape.
Managing Color Changes Effectively for This Bag
In this pattern, managing color changes is crucial for getting the chosen look. The use of a main color and a contrasting color allows for creative expression. It’s key to plan your color layout well, mainly in the motifs and the side sections. When changing colors, ensure that you carry the yarn along the edges to prevent loose ends.
The steps guide you to join the new color in exact places, which helps maintain a clean finish. Also, check weaving in any loose ends as you go, rather than waiting until the end of the project. This will save time and ensure a neater final product.
Specifications for the Carry On Tote Bag Pattern
Sizes & fit
Approx 13″ x 15″ [33 x 38 cm], excluding handles.
Gauge & motif dimensions
14 sc and 15 rows = 4″ [10 cm].
Hook specified in the pattern
Size U.S. J/10 (6 mm) Susan Bates® Silvalume® crochet hook or size needed to obtain gauge.
Materials Required for the Carry On Tote Bag Pattern

Bernat® Maker™ (8.8 oz/250 g; 317 yds/290 m) Main Color (MC) Cream (06003) 1 ball or 310 yds/282 m Contrast A Navy (06017) 1 ball or 260 yds/237 m Size U.S. J/10 (6 mm) Susan Bates® Silvalume® crochet hook or size needed to obtain gauge. Susan Bates® yarn needle.
3rd rnd: Ch 3. 1 dc in each of next 3 dc. *(1 dc. Popcorn. 1 dc) all in next corner ch-1 sp. 1 dc in each of next 4 dc. 1 dc in next ch-1 sp. 1 dc in each of next 4 dc. Rep from * twice more. (1 dc. Popcorn. 1 dc) all in next corner ch-1 sp. 1 dc in each of next 4 dc. 1 dc in last ch-1 sp. Join with sl st to top of ch 3.
4th rnd: Ch 3. 1 dc in each of next 4 dc. *(1 dc. 1 tr. Ch 1. 1 tr. 1 dc) all in top of next popcorn. 1 dc in each of next 11 dc. Rep from * twice more. (1 dc. 1 tr. Ch 1. 1 tr. 1 dc) all in top of last popcorn. 1 dc in each of last 5 dc. Join with sl st to top of ch 3.
5th rnd: Ch 3. 1 dc in each dc to next corner ch-1 sp. *(2 dc. Popcorn. 2 dc) all in next corner ch-1 sp. 1 dc in each dc to next corner ch-1 sp. Rep from * twice more. (2 dc. Popcorn. 2 dc) all in last corner ch-1 sp. 1 dc in each dc to end of rnd. Join with sl st to top of ch 3.
6th rnd: Ch 3. 1 dc in each dc to next popcorn. *(1 dc. 1 tr. Ch 1. 1 tr. 1 dc) all in top of next popcorn. 1 dc in each dc to next popcorn. Rep from * twice more. (1 dc. 1 tr. Ch 1. 1 tr. 1 dc) all in top of last popcorn. 1 dc in each dc to end of rnd. Join with sl st to top of ch 3. 7th and 8th rnds: As 5th and 6th rnds.
9th rnd: As 5th rnd. Fasten off (note ‘Fasten off’ point will be bottom edge of Motif ). Motif Edging: With RS facing, join A with sl to front loop only of right corner popcorn in last rnd. Working in front loops only, work 1 sc in each st down side to next corner popcorn. 3 sc in front loop only of corner popcorn. Working in front loops only, work 1 sc in each st across bottom of Motif (where fasten off occurred) to next corner popcorn. 3 sc in front loop only of corner popcorn. Working in front loops only, work 1 sc up side of Motif to next corner popcorn. Working in front loop only, work 1 sc in popcorn. Fasten off. Side Section: 1st row: With RS of 1 Motif facing, locate rem back loops from Motif Edging rnd. Join MC with sl st in first rem loop. 1 sc in same sp. Work 1 sc in rem back loop of each st along the same row as Motif Edging. (This will create a ridge in A). Turn.
2nd to 8th rows: Ch 1. 1 sc in each sc to end of row. Turn. Do not fasten off – proceed as follows: Join Side Section to 2nd Motif: Locate rem back loops from 2nd Motif Edging rnd. With RS of pieces facing each other, line up 8th row of Side Section with rem back loops of Motif Edging rnd. Working through both thicknesses, join last row of Side Section with rem back loops of Motif Edging rnd with 1 row of sl st. Fasten off. (This will create a ridge in A). Top Border and Straps
Instructions for Completing the Carry On Tote Bag Pattern

Notes:
- Work 2 Motifs with contrast edging.
- Side Section is worked around 3 sides of Motif.
- Top Border and Straps are worked after Motifs and Side Section are joined. MOTIF (make 2) See diagram on page 3. With MC, ch 4. Join with sl st to first ch to form a ring.
1st rnd: Ch 3 (counts as dc here and throughout). 3 dc in ring. (Ch 2. 4 dc in ring) 3 times. Join with hdc to top of ch 3 (creates last ch-2 sp).
2nd rnd: Ch 3. (3 dc. Ch 2. 4 dc) all in ch-2 sp just created. *Ch 1. (4 dc. Ch 1. 4 dc) all in next ch-2 sp. Rep from * twice more. Ch 1. Join with sl st to top of ch 3.
| Abbreviation | Meaning in the original pattern |
|---|---|
| Approx | Approximate(ly) |
| Ch | Chain(s) |
| Dc | Double crochet |
| Hdc | Half double crochet |
| Popcorn | Work 5 dc in indicated space. Drop loop from hook. Insert hook into first of 5 dc and pull dropped loop through. Ch 1 tightly to complete popcorn. |
| Rep | Repeat |
| RS | Right side |
| Sc | Single crochet |
| Sl st | Slip stitch |
| St(s) | Stitch(es) |
| Tr | Treble crochet |
| WS | Wrong side |
| Y oh | Yarn over hook |
CROCHET I SKILL LEVEL: EASY
MATERIALS
Bernat® Maker™ (8.8 oz/250 g; 317 yds/290 m) Main Color (MC) Cream (06003) 1 ball or 310 yds/282 m Contrast A Navy (06017) 1 ball or 260 yds/237 m Size U.S. J/10 (6 mm) Susan Bates® Silvalume® crochet hook or size needed to obtain gauge. Susan Bates® yarn needle.
3rd rnd: Ch 3. 1 dc in each of next 3 dc. *(1 dc. Popcorn. 1 dc) all in next corner ch-1 sp. 1 dc in each of next 4 dc. 1 dc in next ch-1 sp. 1 dc in each of next 4 dc. Rep from * twice more. (1 dc. Popcorn. 1 dc) all in next corner ch-1 sp. 1 dc in each of next 4 dc. 1 dc in last ch-1 sp. Join with sl st to top of ch 3.
4th rnd: Ch 3. 1 dc in each of next 4 dc. *(1 dc. 1 tr. Ch 1. 1 tr. 1 dc) all in top of next popcorn. 1 dc in each of next 11 dc. Rep from * twice more. (1 dc. 1 tr. Ch 1. 1 tr. 1 dc) all in top of last popcorn. 1 dc in each of last 5 dc. Join with sl st to top of ch 3.
5th rnd: Ch 3. 1 dc in each dc to next corner ch-1 sp. *(2 dc. Popcorn. 2 dc) all in next corner ch-1 sp. 1 dc in each dc to next corner ch-1 sp. Rep from * twice more. (2 dc. Popcorn. 2 dc) all in last corner ch-1 sp. 1 dc in each dc to end of rnd. Join with sl st to top of ch 3.
6th rnd: Ch 3. 1 dc in each dc to next popcorn. *(1 dc. 1 tr. Ch 1. 1 tr. 1 dc) all in top of next popcorn. 1 dc in each dc to next popcorn. Rep from * twice more. (1 dc. 1 tr. Ch 1. 1 tr. 1 dc) all in top of last popcorn. 1 dc in each dc to end of rnd. Join with sl st to top of ch 3. 7th and 8th rnds: As 5th and 6th rnds.
9th rnd: As 5th rnd. Fasten off (note ‘Fasten off’ point will be bottom edge of Motif ). Motif Edging: With RS facing, join A with sl to front loop only of right corner popcorn in last rnd. Working in front loops only, work 1 sc in each st down side to next corner popcorn. 3 sc in front loop only of corner popcorn. Working in front loops only, work 1 sc in each st across bottom of Motif (where fasten off occurred) to next corner popcorn. 3 sc in front loop only of corner popcorn. Working in front loops only, work 1 sc up side of Motif to next corner popcorn. Working in front loop only, work 1 sc in popcorn. Fasten off. Side Section: 1st row: With RS of 1 Motif facing, locate rem back loops from Motif Edging rnd. Join MC with sl st in first rem loop. 1 sc in same sp. Work 1 sc in rem back loop of each st along the same row as Motif Edging. (This will create a ridge in A). Turn.
2nd to 8th rows: Ch 1. 1 sc in each sc to end of row. Turn. Do not fasten off – proceed as follows: Join Side Section to 2nd Motif: Locate rem back loops from 2nd Motif Edging rnd. With RS of pieces facing each other, line up 8th row of Side Section with rem back loops of Motif Edging rnd. Working through both thicknesses, join last row of Side Section with rem back loops of Motif Edging rnd with 1 row of sl st. Fasten off. (This will create a ridge in A). Top Border and Straps Note: When working 1st rnd, take care to work into A ‘ridges’ to align them towards Side Sections (see photo).
1st rnd: (RS). Join A with sl st on upper edge in top of A ‘ridge’ on left corner of Motif. Ch 1. Work 9 sc across top of Side Section. Work 1 sc in each st across top of Motif (37 sc). Work 9 sc across top of 2nd Side Section. Work 1 sc in each st across top of 2nd Motif (37 sc). 92 sc. Join with sl st to first sc.
2nd to 7th rnds: Ch 1. 1 sc in each sc around. Join with sl st to first sc.
8th rnd (Place Straps): Ch 1. 1 sc in each of first 15 sc. Ch 51. Skip next 25 sc. 1 sc in each of next 21 sc. Ch 51. Skip next 25 sc. 1 sc in each of last 6 sc. Join with sl st to first sc.
9th rnd: Ch 1. 1 sc in each sc and ch to end of rnd. Join with sl st to first sc. 144 sc.
10th to 12th rnds: Ch 1. 1 sc in each sc around. Join with sl st to first sc. Fasten off.
Frequently Asked Questions about the Carry On Tote Bag
What size does the finished tote bag measure?
The done tote bag measures about 13 by 15 inches, excluding the handles. This size makes it perfect for carrying a range of items, whether you’re heading to the beach, the grocery store. Just out for a day.
Keep in mind that the sizes can vary slightly based on your individual crochet tension and skill. It’s always a good idea to check your gauge to ensure the best fit.
How do I ensure I achieve the correct gauge?
Getting the correct gauge is key to making sure that your done tote bag turns out as planned. The pattern lists a gauge of 14 single crochets and 15 rows for every 4 inches. To check your gauge, make a small swatch before starting on the actual bag.
If your gauge does not match, you may need to adjust your hook size. Experiment with a larger or smaller hook until you achieve the correct stitch count and row height.
Can I use different yarn for this pattern?
While the pattern calls for Bernat Maker yarn, you can experiment with other yarns if chosen. Still, be aware that distinct yarns can have varying weights and textures. May affect the full look and feel of the tote bag.
If you choose a distinct yarn, ensure that it is comparable in weight to maintain the integrity of the pattern. Always check your gauge when switching yarn types.

Now that you have a better knowing of the Carry On Tote Bag, gather your supplies and start making! This project is a wonderful way to enhance your skills while creating something useful and stylish.
Save & Print This Crochet Pattern
Prefer working offline or keeping a printed copy in your project bag? Download our formatted Crochet Carry On Tote Bag printable PDF guide below, complete with the full materials table, stitch diagrams, color-key charts, and step-by-step assembly instructions prepared for Derecipe.
READER COMMENTS & PATTERN QUESTIONS
Have a question about stitch counts, yarn substitutions, or sizing? Leave a comment below — Mary Ward reads and replies to every maker question!