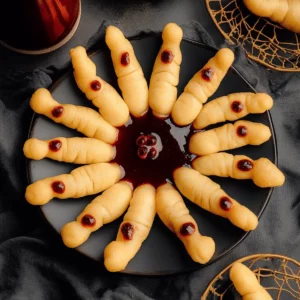
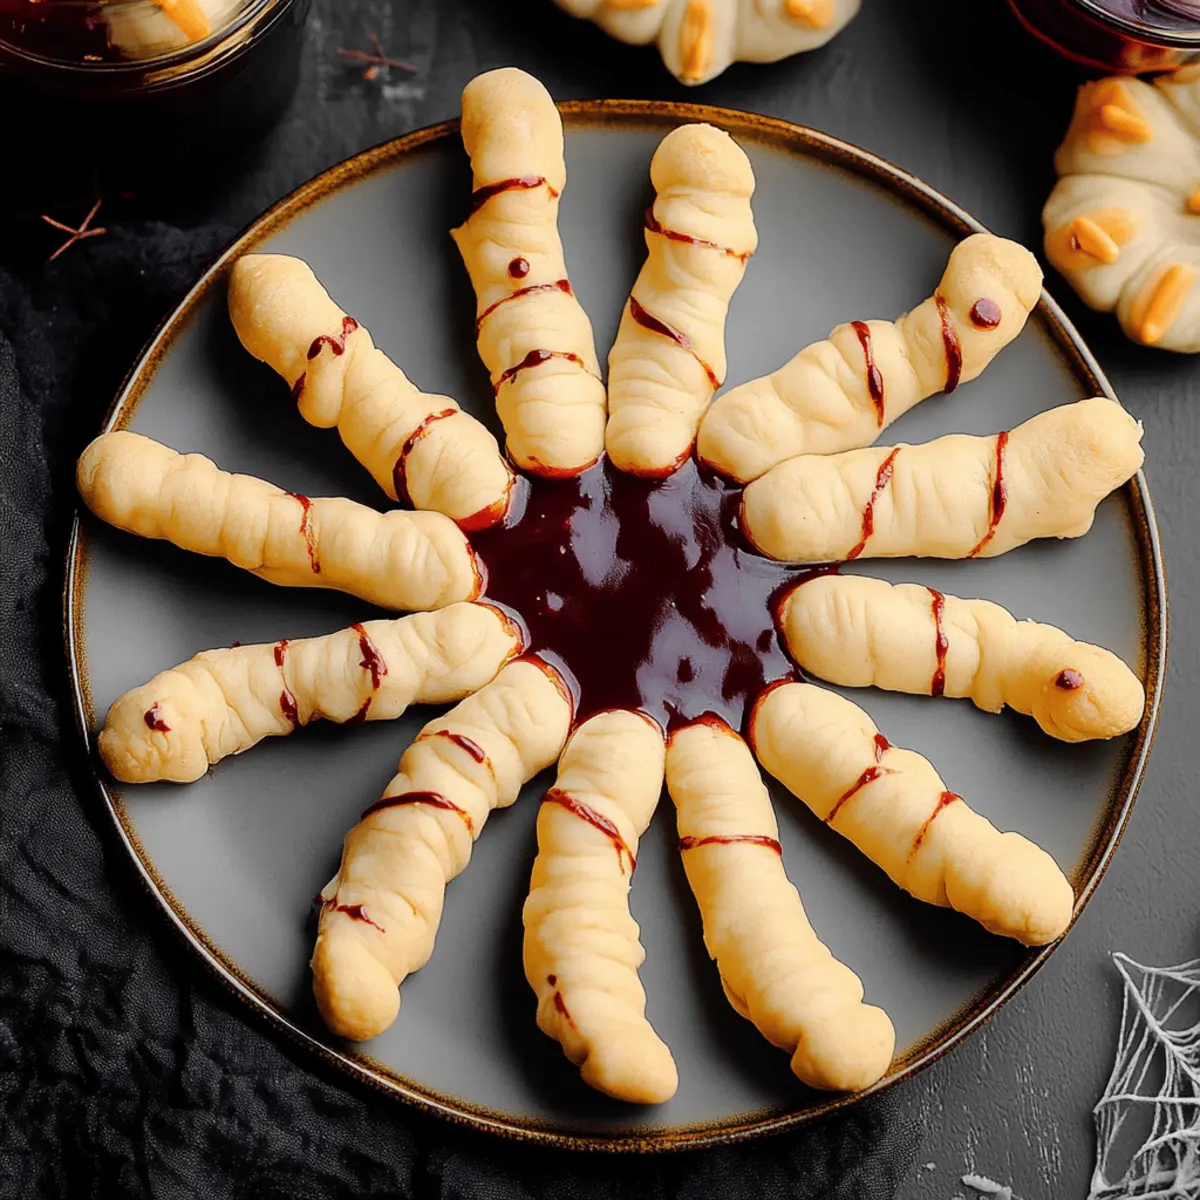
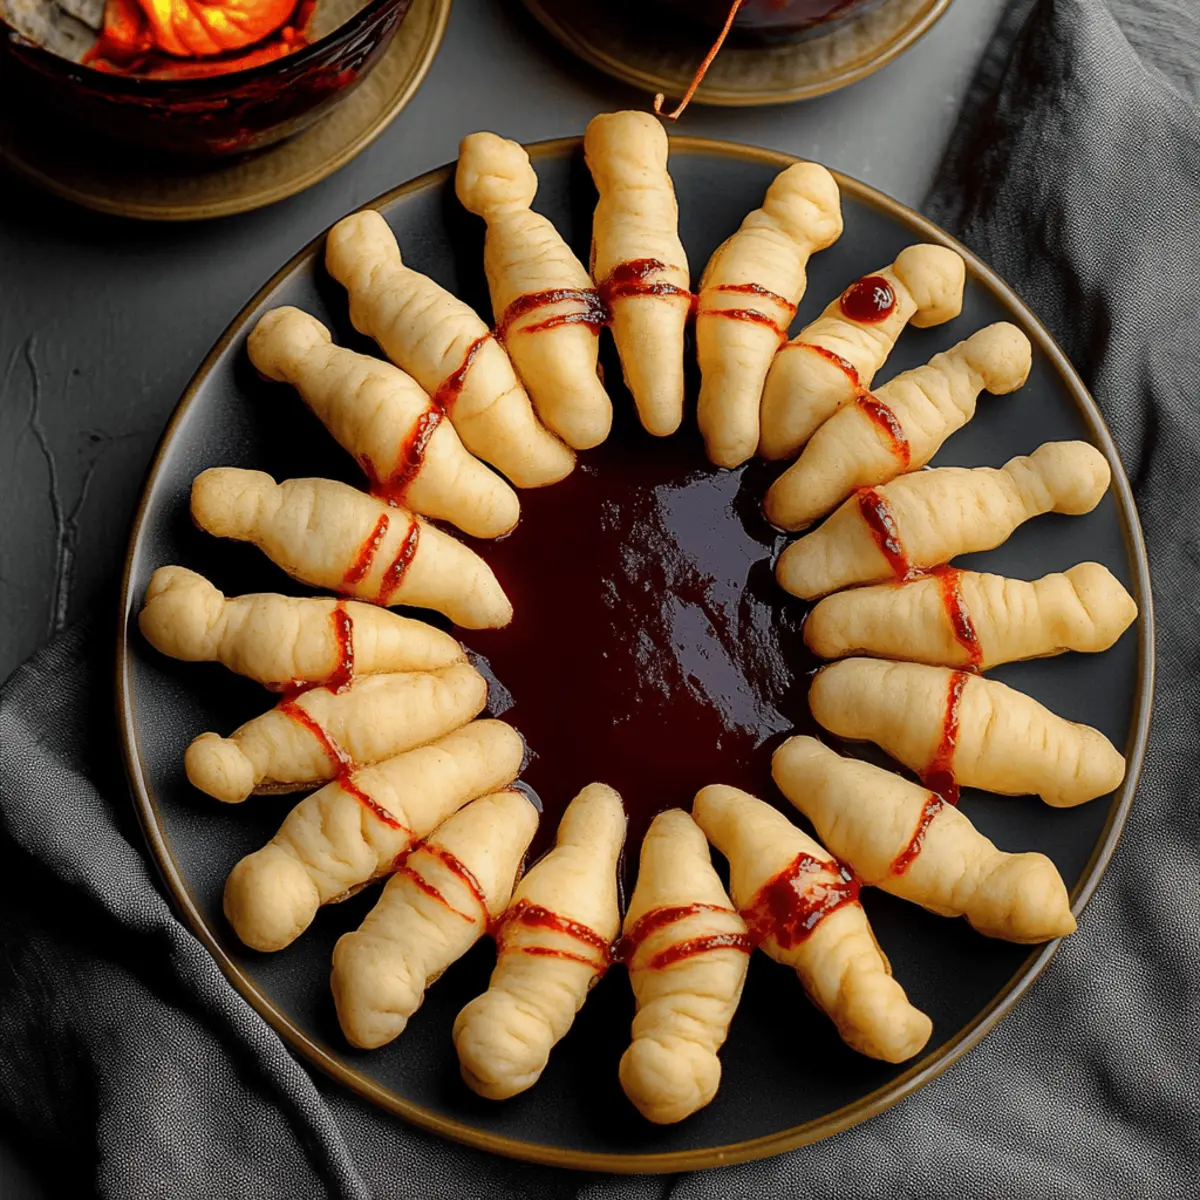
There’s something delightfully eerie about biting into a cookie that looks like a creepy witch finger. These Easy Halloween Spooky Fingers are not just a treat; they’re a spectacle! The buttery, melt-in-your-mouth cookie dough, paired with a gooey, oozy strawberry jam, will have you feeling like a baking wizard right in your own kitchen. With a perfectly almond “nail” on top, each finger cookie exudes a charm that’s simply irresistible.
Gather your friends and prepare to bake these spookily delightful morsels – they are perfect for Halloween parties, school events, or just to scare up some fun in the kitchen. You’ll not only impress your guests but also enjoy the sweet satisfaction of creating these wickedly delicious cookies!
Why You'll Love This Easy Halloween Spooky Fingers
- This incredible Easy Halloween Spooky Fingers transforms simple everyday ingredients into restaurant-quality flavors that will blow your mind completely.
- Foolproof recipe techniques guarantee perfect results every single time, making even novice cooks feel like professional chefs instantly.
- Stunning visual appeal with gorgeous colors and mouthwatering aromas creates the ultimate Instagram-worthy dish for any special occasion.
- Endlessly adaptable for different dietary needs while working beautifully for meal prep, date nights, or entertaining large groups effortlessly.
Ingredients for Easy Halloween Spooky Fingers
Here’s what you’ll need to make this delicious Easy Halloween Spooky Fingers:
1 cup (226 grams) butter – Make sure it’s softened to room temperature for easy mixing.
1 cup (115 grams) powdered sugar – This adds sweetness and creates a smooth and fluffy texture.
1/2 cup (100 grams) granulated sugar – A touch of granulated sugar adds a slight crunch to the cookies.
1 large egg (50 grams, out of shell) – This binds the dough together and enriches the flavor.
1 teaspoon almond extract – Almond extract gives the cookies a lovely nutty flavor that complements the almonds.
1 teaspoon vanilla extract – Adds warmth and sweetness to the overall flavor profile.
2 2/3 cups (334 grams) flour – All-purpose flour works perfectly for the structure of the cookies.
3/4 teaspoon salt – Enhances the sweetness and balances the flavors.
3/4 cup (105 grams) almonds – Blanched almonds are used as the “nails” of the witch fingers, giving them a realistic look.
1/2 – 1 cup (118 to 236 ml) strawberry jam – This provides a delicious filling that brings a pop of color and flavor to each cookie.
How to Make Easy Halloween Spooky Fingers
Follow these simple steps to prepare this delicious Easy Halloween Spooky Fingers:
Step 1: Cream the Butter and Sugars
In a large mixing bowl, use an electric mixer to beat together the softened butter, powdered sugar, and granulated sugar until the mixture becomes fluffy and light in color. This should take about 3-4 minutes.
Step 2: Add the Egg and Extracts
Add the egg, almond extract, and vanilla extract to the fluffy butter mixture. Mix until everything is well combined. You’ll notice a lovely aroma filling your kitchen.
Step 3: Mix in the Flour and Salt
Gradually add the flour and salt into the mixture. Mix slowly until all ingredients are well combined into a soft, slightly sticky dough.
Step 4: Chill the Dough
Once your dough is together, cover the bowl with plastic wrap. Place it in the refrigerator for about 40 minutes. This helps the ingredients meld together and makes the dough easier to work with.
Step 5: Shape the Fingers
Preheat your oven to 325°F (165°C) and line a baking sheet with parchment paper. Take a quarter of the chilled dough and roll it into finger shapes, about 3-4 inches long. Press a blanched almond at the tip of each finger to create a “nail.” Squeeze the dough in the middle to form knuckles and use a sharp knife to create little lines for wrinkles.
Step 6: Bake and Finish
Place the shaped cookies onto the prepared baking sheet, leaving space between them. Bake for 17-22 minutes, until they are slightly golden. Allow them to cool for a few moments before removing the almonds. Add a bit of strawberry jam in the cavity where the almond was, then place the almond back on top with a bit of jam oozing out around the knuckles.
Serve these whimsical treats to your friends and family, and watch their faces light up as they dive into these delicious Easy Halloween Spooky Fingers. Whether it’s a Halloween party, a casual get-together, or just a special treat for yourself, these cookies will surely cast a delightful spell! Happy baking!
You Must Know About Easy Halloween Spooky Fingers
- This showstopping Easy Halloween Spooky Fingers delivers restaurant-quality results using simple ingredients you probably already have at home.
- The perfect balance of textures and flavors creates an unforgettable dining experience that will have everyone asking for seconds.
- Picture-perfect presentation with vibrant colors makes this dish absolutely Instagram-worthy and guaranteed to impress any dinner guest.
- Incredibly versatile recipe that works beautifully for weeknight dinners, meal prep, special occasions, or even outdoor entertaining sessions.
Perfecting Easy Halloween Spooky Fingers Cooking Process
Start by creaming the butter and sugars until fluffy, then incorporate the egg and extracts. Mix in the flour and salt, refrigerate the dough, and preheat the oven before shaping into fingers and baking for that perfect spooky look.
Add Your Touch to Easy Halloween Spooky Fingers
Try using different nut types for the fingernails, such as pecans or hazelnuts. You can swap the strawberry jam for raspberry or blackberry for a unique flavor twist that adds to the spooky presentation.
Storing & Reheating Easy Halloween Spooky Fingers
Store any leftover cookies in an airtight container at room temperature for up to a week. To reheat, place them in a 300°F (150°C) oven for about 5 minutes to refresh the texture and flavor.
Chef's Helpful Tips for Easy Halloween Spooky Fingers
- This professional-quality Easy Halloween Spooky Fingers relies on precise timing and temperature control to achieve restaurant-standard results consistently.
- Master the art of mise en place by prepping all ingredients beforehand, ensuring smooth execution and preventing any last-minute cooking disasters.
- The secret lies in layering flavors throughout the cooking process rather than seasoning only at the end for maximum depth.
- Pro tip: let the finished dish rest for optimal texture and flavor development before serving to hungry guests waiting eagerly.
Sharing these witch finger cookies at a Halloween party was unforgettable; the fun reactions and laughter from my friends when they took their first bites were priceless. It made all the effort completely worth it.
FAQs About Easy Halloween Spooky Fingers
What is Easy Halloween Spooky Fingers?
Easy Halloween Spooky Fingers are playful and eerie cookies designed to look like severed witch fingers. This delightful Halloween treat features a buttery dough that is sculpted into finger shapes, complete with almond “nails” and jam that oozes out for a spooky effect. They’re not just fun to look at; they’re also delicious, with a sweet taste and a hint of almond flavor. Whether you’re hosting a Halloween party or just looking to surprise your family with a special treat, these cookies are sure to impress and delight!
How do I make Easy Halloween Spooky Fingers?
To make Easy Halloween Spooky Fingers, start by creaming butter and sugars until fluffy, then add an egg and flavor extracts. Gradually mix in flour and salt, and refrigerate the dough. Shape the dough into finger forms, ensuring to add almonds as nails. After baking, fill the cavities with jam for a creepy look. The entire process takes around 1 hour and 25 minutes from start to finish, making it manageable for a fun Halloween baking session!
How can I customize Easy Halloween Spooky Fingers?
You can easily customize Easy Halloween Spooky Fingers by experimenting with different nuts for the fingernails, such as pecans or hazelnuts. Additionally, swap out strawberry jam for raspberry, blackberry, or even orange marmalade to create varied flavors and looks. For an extra creative touch, you can dust the cookies with powdered sugar or add edible decorations to enhance their spooky appearance.
Can I store leftover Easy Halloween Spooky Fingers?
Absolutely! Store any leftover Easy Halloween Spooky Fingers in an airtight container at room temperature for up to a week. If you want to refresh them, simply warm the cookies in a 300°F (150°C) oven for about five minutes. This easy storage solution ensures you can enjoy your spooky treats well after Halloween festivities are over.
Conclusion for Easy Halloween Spooky Fingers
Easy Halloween Spooky Fingers are the perfect blend of fun and flavor for the spooky season. With simple ingredients and an engaging preparation process, you can create these eye-catching treats that will have everyone talking. Remember to experiment with different flavors and toppings to make your spooky fingers uniquely yours. So this Halloween, whip up a batch of Easy Halloween Spooky Fingers and delight your friends and family with these tasty, creepy cookies!

Easy Halloween Spooky Fingers: Delicious Witch Finger Cookies Recipe
Ingredients
Equipment
Method
- In a large mixing bowl, beat together the butter and powdered sugar (and granulated sugar, if using) until fluffy. Add the egg, almond extract, and vanilla extract and mix. When well combined, add the flour and salt.
- When thoroughly combined, cover with plastic wrap and refrigerate for 40 minutes or up to 2 days.
- Preheat your oven to 325°F (165°C) and line a baking sheet with a piece of paper.
- Take about a fourth of the dough out of the fridge and begin rolling out the fingers.
- Add an almond to the tip for the fingernail, and press down to make sure it’s secure.
- Form a knuckle by squeezing around the middle. Use a sharp knife for the wrinkles in the knuckles and vary the length.
- Place on the prepared cookie sheet, leaving about an inch (2.5cm) between them. Repeat with the rest of the dough until the cookie sheet is full.
- Bake for 17 – 22 minutes or until slightly golden.
- Let the cookies cool on the sheet, then remove the almonds from the cookies. Add some jam in the cavities and then put the almonds back, making sure you used enough jam for them to ooze a little. Also, add some jam around the knuckles.