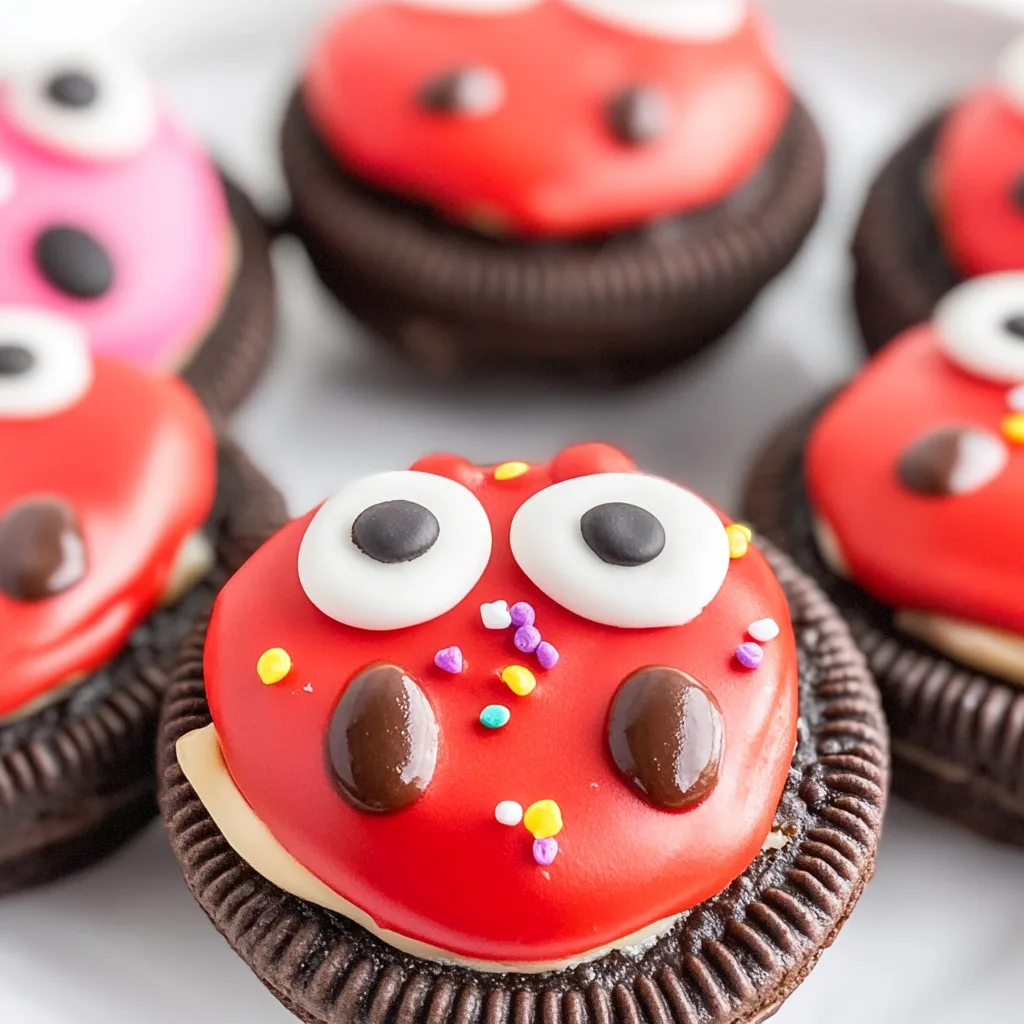
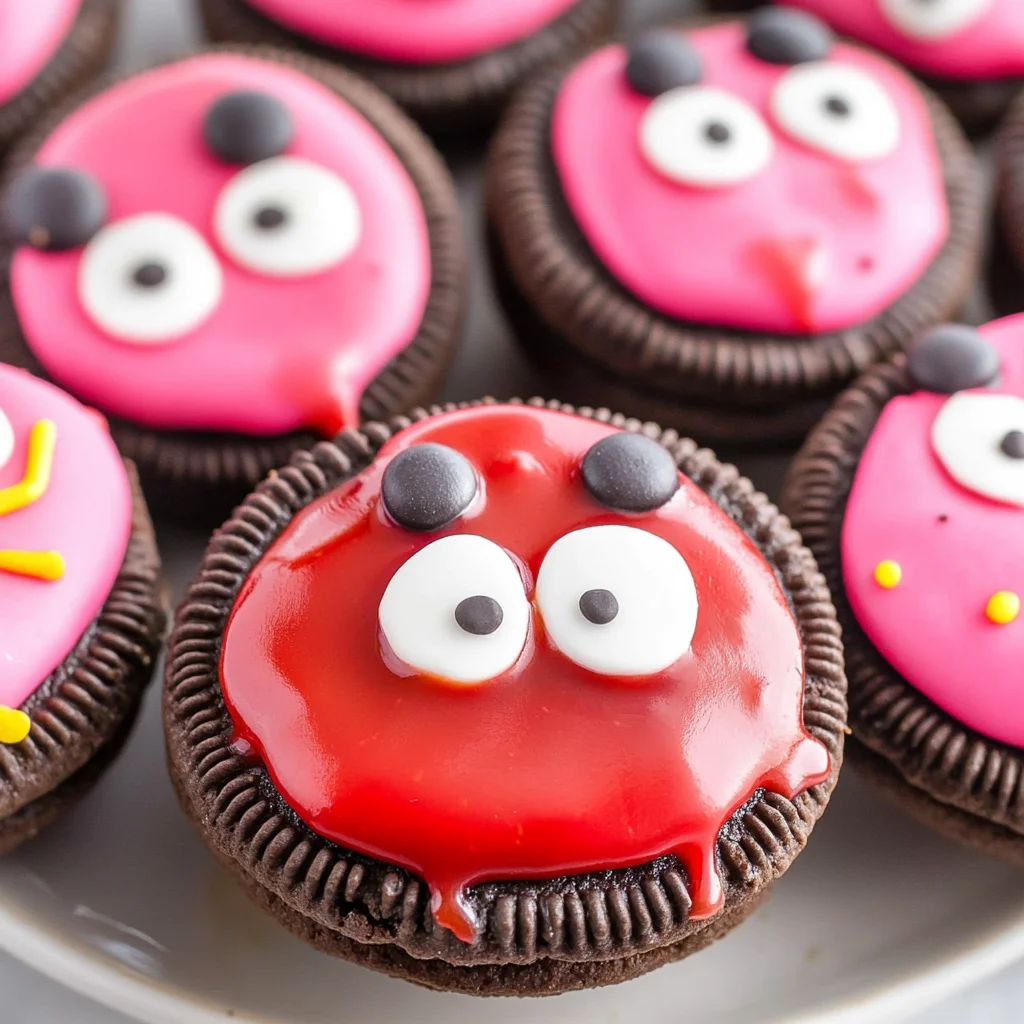
Imagine biting into a delightful Love Bug Oreo, where the rich chocolate cookie meets the velvety sweetness of colorful icing, creating a flavor explosion that dances on your taste buds. The vibrant colors and whimsical candy decorations are not just visually appealing; they evoke a sense of joy and nostalgia, reminding you of carefree childhood days filled with laughter and sweet treats.
These adorable cookies shine at any celebration, especially on Valentine’s Day when love is in the air. Whether you’re making them for a special someone or just to spread some cheer among friends and family, each bite promises a delightful burst of flavor that will leave everyone smiling. Join me in crafting these charming Love Bug Oreos and experience the magic of baking that brings warmth to every heart!
Why Is Love Bug Oreos So Irresistibly Good?
Cute and Festive: These adorable treats are perfect for Valentine’s Day, instantly brightening up any gathering.
Easy to Make: With just 30 minutes of prep and no baking required, you’ll have fun creating these delightful cookies!
Colorful Appeal: The vibrant red and white colors make them visually stunning, sure to impress your guests.
Crowd-Pleaser: Kids and adults alike will adore the combination of chocolatey Oreos and sweet candy decorations.
Versatile Treats: Customize them for any occasion by changing the colors or toppings, making every batch unique!
Love Bug Oreos Ingredients
For the Cookies
- 1 package Oreo cookies (Regular or double-stuffed) – These classic cookies provide a rich chocolate flavor and a delightful crunch that kids and adults love.
For the Decorations
- 1 cup red candy melts (Melted for coating) – Use these vibrant melts to create a sweet and colorful outer layer that captures the festive spirit.
- 1 cup white candy melts (Melted for eyes) – These will add a cute touch for the eyes, making your Love Bug Oreos extra adorable.
- 1/2 cup mini chocolate chips (For eyes) – These tiny treats bring personality to your cookies, giving them a charming look that’s hard to resist.
- 1/2 cup red M&M’s (For the mouth) – A playful addition that adds color and sweetness, completing the fun design of your Love Bug Oreos.
- 1 cup black icing (For antennae and details) – This icing is perfect for adding those whimsical touches that make your Love Bug Oreos come to life.
How to Make Love Bug Oreos
1. Melt the red candy melts according to package instructions. Dip each Oreo cookie halfway into the melted candy, creating a vibrant red coat. Place them on a parchment-lined baking sheet to set for about 10-15 minutes.
2. Pipe the white candy melts onto each cookie once the red coating has set. Create two small circles for the eyes and place a mini chocolate chip on each white circle, giving your Love Bug Oreos their adorable pupils.
3. Decorate with black icing to pipe antennae atop each cookie, adding personality to these charming treats. Finish off with a red M&M for the mouth, bringing these love bugs to life!
4. Set the cookies aside and allow them to completely firm up before serving—this should take another 10-15 minutes. Enjoy the delightful appearance and taste of your Love Bug Oreos!
Optional: For an extra touch, sprinkle some edible glitter on top before serving!
Exact quantities are listed in the recipe card below.
Expert Tips
- Candy Melt Consistency: Ensure the red candy melts are completely melted for a smooth coating; lumps can lead to uneven dips on your Love Bug Oreos.
- Piping Precision: Use a fine piping tip when applying the white candy melts for the eyes; this helps create neat circles and avoids messy drips.
- Eye Placement: Allow the white candy melt eyes to slightly set before placing mini chocolate chips. This prevents them from sinking into the melts.
- Antennas Angle: Pipe the black icing antennae straight and upright to make your Love Bug Oreos look more lively and fun!
- Setting Time: Be patient! Let each layer set completely before moving on to the next step to avoid smudging your adorable designs.
How to Store Love Bug Oreos the Right Way
- Room Temperature: Store your Love Bug Oreos in an airtight container for up to 3 days to keep them fresh and delicious.
- Fridge: If you want to extend their shelf life, place them in the fridge for up to a week, wrapped securely to prevent drying out.
- Freezer: For longer storage, freeze the decorated cookies in a single layer on a baking sheet, then transfer them to an airtight container for up to 2 months.
- Reheating: There’s no need to reheat these treats; simply enjoy them chilled or at room temperature for the best taste!
Love Bug Oreos Your Way
Feel free to unleash your creativity and customize these adorable treats to suit your taste and dietary needs!
- Gluten-Free: Use gluten-free chocolate sandwich cookies instead of regular Oreos for a delightful, safe version. These cookies maintain the same festive spirit while accommodating gluten sensitivities.
- Dairy-Free: Swap regular candy melts with dairy-free alternatives to make this treat suitable for lactose-intolerant friends. Enjoy the same rich flavors without the dairy, making it inclusive for everyone!
- Nut-Free: Ensure all candy decorations are nut-free, especially if serving to children or guests with nut allergies. You can still have fun decorating without compromising safety.
- Colorful Coating: Experiment with different colored candy melts like pink or purple for a unique twist on the classic design. This simple change adds an extra pop of color that’s perfect for any celebration!
- Crunchy Texture: Add crushed pretzels or nuts to the melted red coating for extra crunch and flavor. This texture contrast takes the Love Bug Oreos to a whole new level, making each bite even more satisfying.
- Spicy Kick: Incorporate a pinch of cayenne pepper into the melted chocolate for an unexpected heat. This surprising twist will delight adventurous eaters looking for something different!
- Fruit Flavor: Mix in some fruit-flavored sprinkles or edible glitter into the white candy melts for an exciting fruity flavor burst. It’s a fun way to add sweetness and visual appeal!
Make Ahead Options
Preparing Love Bug Oreos ahead of time is a wonderful way to streamline your baking process, especially when you’re gearing up for a special occasion like Valentine’s Day. You can easily melt the red and white candy melts, dip your Oreo cookies, and let them set up to 24 hours in advance. Once the cookies are coated, simply store them in an airtight container at room temperature. The same goes for the decorations: prepare the black icing and have your mini chocolate chips and red M&M’s ready to go; they can be prepped up to 3 days ahead. When you’re ready to serve, just pipe the eyes and antennae onto your Love Bug Oreos, add the red M&M for the mouth, and enjoy these delightful treats fresh! This approach not only saves you time but also ensures that every bite of your adorable cookies is as delicious as ever.
Love Bug Oreos Recipe FAQs
Are there any alternatives to Oreo cookies for the Love Bug Oreos?
While Oreo cookies provide the perfect chocolatey base for these adorable treats, you can experiment with other sandwich cookies like Newman’s Own or even homemade chocolate cookies if you’re feeling adventurous. Just make sure they have a similar texture to hold up when dipped in candy melts!
How should I store my Love Bug Oreos?
To keep your Love Bug Oreos fresh, store them in an airtight container at room temperature for up to five days. If you live in a warm climate, consider refrigerating them for added freshness. Just allow them to come to room temperature before serving for the best flavor and texture!
Can I freeze Love Bug Oreos?
Absolutely! If you want to make these festive treats ahead of time, you can freeze them for up to three months. Just layer them between sheets of parchment paper in a freezer-safe container. When you’re ready to enjoy them, let them thaw in the fridge overnight before serving.
What should I do if my candy melts aren’t coating properly?
If your red candy melts are too thick or not coating well, try adding a teaspoon of vegetable oil or shortening while melting them. This will help achieve a smoother consistency that’s easier to dip and coat your Oreo cookies evenly. Remember to melt slowly in the microwave, stirring every 30 seconds until fully smooth.
How many servings does this recipe yield?
This delightful Love Bug Oreos recipe makes about four servings, with each serving containing approximately 150 calories. They’re perfect for sharing with loved ones on special occasions like Valentine’s Day or simply as a sweet treat anytime!
Are there any dietary considerations I should be aware of?
These Love Bug Oreos are not gluten-free due to the use of traditional Oreo cookies, and they contain dairy from the candy melts and chocolate chips. For a vegan version, look for dairy-free chocolate sandwich cookies and plant-based candy melts available at specialty stores!
Love Bug Oreos
Ingredients
Method
- Melt the red candy melts according to package instructions. Dip each Oreo cookie halfway into the melted candy and place on a parchment-lined baking sheet to set.
- Once the red coating has set, use the white candy melts to pipe two small circles on each cookie for the eyes. Place a mini chocolate chip on each white circle to create the pupils.
- Use the black icing to pipe antennae on top of the cookies and add a red M&M for the mouth.
- Allow the cookies to set completely before serving. Enjoy your Love Bug Oreos!